How to Ace the Charged Interaction DMZ Mission Without Blowing Yourself Up
Crown Charged Interaction DMZ Tier 5 mission guide reveals strategies for explosive charge handling, Dead Drop use, and Shopkeeper delivery.
If you've been grinding through the Crown faction missions in DMZ like a caffeinated squirrel hoarding nuts, you've probably hit Tier 5 by now. That's where Charged Interaction lives—a mission that feels less like a tactical op and more like a frantic game of hot potato with a bomb. I remember staring at the objectives and thinking, "Who in Al Mazrah's Bureau of Sadism designed this?" But after a few white-knuckled attempts (and one spectacular detonation that turned my squad into pink mist), I finally cracked the formula. Let me walk you through it so you can grab that contraband Riot Shield and 20,000 XP without nursing a migraine.
What You're Actually Doing Here
Crown's Charged Interaction is a Tier 5 mission for Seasons 4 and 5—though in 2026 it's still a classic test of nerves for anyone deep into DMZ. The checklist is three-fold:
-
🧨 Snatch the explosive charge from the tunnel entrance at Zaya Observatory
-
🚮 Dump it into any Dead Drop to neutralize its timer
-
🛒 Deliver the defused charge to the Shopkeeper inside Koschei Complex
Fail any part, and you're either blown to bits or back to the lobby with nothing but regret. Succeed, and the game gifts you a riot shield and enough XP to make a dent in your battle pass. Ready to become a bomb courier? Let’s go.
Step 1: Grab the Angry Pineapple
The explosive charge spawns at the tunnel northwest of Zaya Observatory. Picture a closed tunnel entrance that looks like someone tried to hide a munitions truck with a half-hearted plywood facade. Looting it triggers the first objective immediately—but it also starts a 5-minute countdown. That’s right, you’re now holding an explosive device with the same energy as a toddler who just discovered the word “no”.
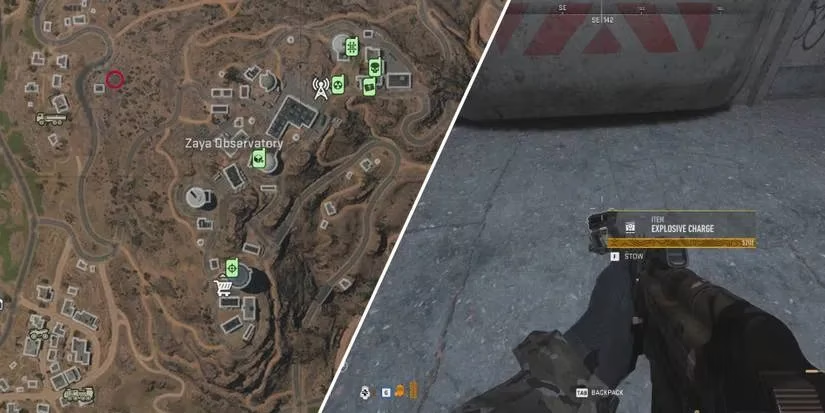
If you’ve done The Transporter before, this item will feel like a bad sequel. The key is speed: don’t stop to loot every toothbrush and screwdriver on the way. Get in, grab it, and bolt. I’ve learned that the AI around Zaya has the aim of a caffeinated stormtrooper, so smoke grenades and a vehicle are your best friends. Once the charge is in your backpack, you’ll see the timer ticking down like a microwave counting the last seconds before your burrito explodes. No pressure.
Step 2: The Dead Drop Disposal (Or: Throwing the Grenade into the Fridge)
Now you need to neutralize the charge by placing it in any Dead Drop. Any dumpster will do, but you want one nearby because that timer doesn’t pause for a scenic drive. Zaya has a Dead Drop right on site, but it’s often swarmed by bots who apparently unionized to protect their trash bins. I prefer the dumpster behind the southern gas station at Zarqwa Hydroelectric—it’s quieter, and the only thing you’ll fight is the odd stray dog.
When you open the Dead Drop, you’re essentially playing a reverse takeout game: you’re putting the ticking meal inside the fridge. The moment you stash the charge, the timer stops dead. It’s like watching a heart monitor flatline, but in a good way. Congratulations, you’ve just convinced a bomb to take a nap.
Step 3: The Koschei Shopkeeper Delivery (The Real Marathon)
This is where things get ".zip code – confusing". You need to take the now-harmless charge to the Shopkeeper in Koschei Complex. If you’ve never ventured into this bunker, imagine a Soviet-themed IKEA designed by someone who hates you. There are four entrances across Al Mazrah, and each one dumps you into a different sector.
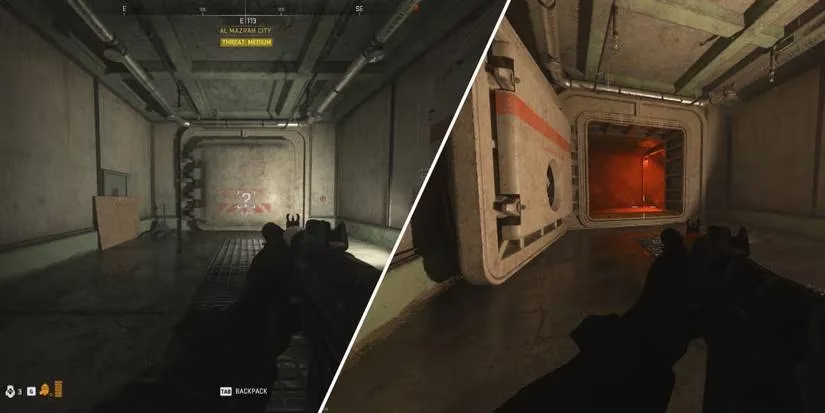
Once inside, follow the red arrows like breadcrumbs through a horror dungeon. You’ll eventually hit a blast door leading to the Chemical Treatment Plant. Opening it might require a Car Battery and Jumper Cables if you’re in sectors like External Ops or Information Extraction—items that sound like they belong in a mechanic’s glove box, not a covert ops mission. Pro tip: bring these with you before you infil. Nothing stings more than finding the door and realizing you left the car battery in your other operator.
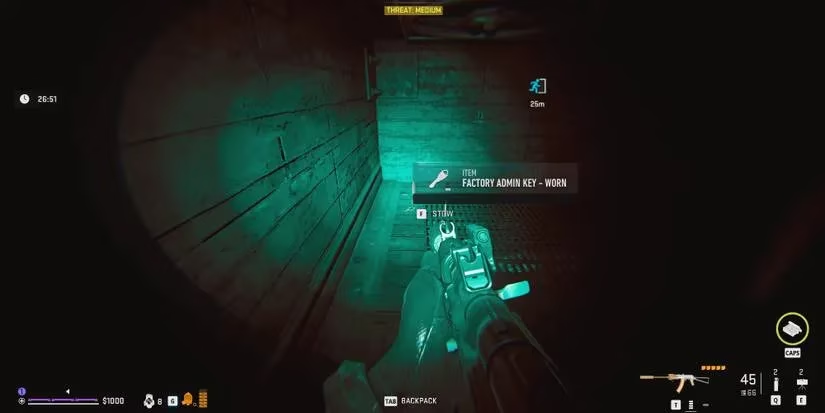
Now you’re in the Chemical Treatment Plant—congrats, you’ve upgraded from bomb courier to hazmat tourist. Your target is the Factory Admin sector. To get there, you need one of two Factory Admin Keys. One always spawns inside an air duct (look for vents that whisper "I contain a key"), and the other can drop from a soldier you kill. It’s like winning a really tense game of hide-and-seek where the prize is more walking.
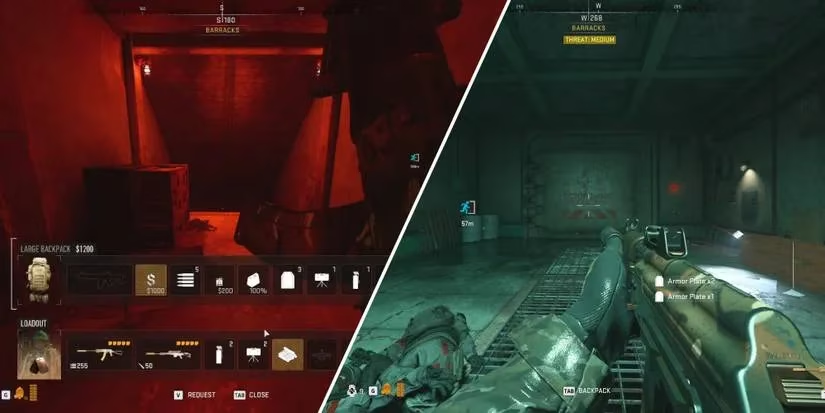
Unlock the Factory Admin door (check the A/1 and A/2 blast doors north of the plant), then push into the main area. The Shopkeeper is on the south side, chilling like a bunker Walmart greeter. Interact with his Dead Drop, deposit the charge, and feel the sweet surge of accomplishment—along with that riot shield and 20k XP. I half expected the Shopkeeper to hand me a coupon for 10% off my next explosive purchase, but no, just a mission complete screen.
Final Words from a Reformed Pyromaniac
Charged Interaction is a masterclass in DMZ mission design: equal parts panic, precision, and puzzles. It reminded me of trying to return a defective high-tech gadget before the store closes, except the gadget could vaporize a city block and the store is an underground bunker guarded by madmen. The first two steps are adrenaline-fueled sprints, but the Koschei leg is a slow-cooked puzzle where patience is the real secret ingredient.
Bring a squad if you can—having someone watch your back while you fiddle with battery cables turns this from a solo nightmare into a coordinated heist. And if you’re a completist, that riot shield will look mighty fine in your contraband stash. Now go forth, deliver that charge, and remember: the Shopkeeper doesn’t accept tips, but he does accept large explosive devices delivered with a smile.
✅ Step 1: Zaya Observatory tunnel → grab charge (5 min timer starts)
✅ Step 2: Any Dead Drop (Zarqwa Hydroelectric southern gas station recommended) → disarm charge
✅ Step 3: Koschei Complex → Chemical Treatment Plant → Factory Admin → Shopkeeper Dead Drop → deliver charge